
Let’s Design Some Pins!
Right off the bat, I want to say this - if you’re totally clueless when it comes to graphics software, if you have no idea what a “vector” is, or if “Adobe” brings to mind Southwestern houses… that’s totally okay. In this post, I’m going to run you through a few different ways you can create your art that we can absolutely, totally work from - the best method is whatever one is most comfortable for YOU. We can handle just about anything, so if you aren’t sure, just send it over to us at orders@alchemymerch.com. As long as you can send us some kind of clean file, we can make a vector for you for free! (With one caveat- if your art requires a lot of work to get it to a point where we can make a vector, we may need to charge for art time so our staff artists can re-create the art in a pin-friendly format. Don’t worry, that’s definitely something we’ll discuss with you first!)

Most of the pins we make start as raster images, like this beauty from Kory Bing. As long as the file is large and crisp, rasters work great!
Back to Basics: Drawing By Hand
Yep, believe it or not, we can totally work from a hand-drawn picture! Admittedly, this method gives you a little less control over the final output than some of the others, but it can also be a great way to maintain a hand-done feel in the final pin, which can add a ton of charm. In order to work from a hand drawing, we need a clear, black and white outline only. It’s fine to send a colored version as well (that will help us add color) but in order to create the vector file that we need, we need a good-quality scan or photograph of black ink on white paper, with crisp, not-sketchy lines. Tracing over your existing art onto a new sheet of paper with a nice black pen is usually the easiest thing to do. Once we’ve created the vector, we can easily color in the spaces, like a coloring book. If you don’t have access to a scanner, even a clear cell phone picture will do! (Or you may be able to use one at your local copy shop or library.) We understand that not everyone is familiar with design software, and that’s okay- as long as you can send us clear outlines, we can make it work!

This handsome guy by artist Braden Duncan started out as a traditional paper drawing, inspired by one of her paintings.
Raster Programs: Photoshop, Procreate, etc
If you’re already comfortable in a raster-based graphics program like Photoshop or one of the many drawing apps out there, that’s perfect! We can easily make vectors from those images. Like with hand-drawing, the outlines need to be crisp and not sketchy - and also like hand-drawing, it can be helpful to send an outline without any color. Any sort of “brushy” or watercolor effects won’t translate, so stick to solid blocks of color surrounded by solid outlines. Please remove any effects like a drop shadow, gradients, etc before sending.
Each raster file contains a set number of pixels, which means that while it’s easy to make your work smaller, making it larger means you will lose quality - it will stretch the pixels and blur the details. It’s always best to design larger than you will need (good advice for any product you create!) If you want a 1.5” pin, try designing at around 6” and 300dpi (dots per inch- this refers to the resolution of the piece, and is a setting you can change in your design program).
Placing your Photoshop file or jpg into Illustrator and saving it as a .ai file will not make it a vector, it’s just a raster file sitting inside a vector file. But that’s okay, we can make the vector on our end!
Remember: the outline will be the metal, so consider your metal color as you work! You may not want to use charcoal as a fill color if you’re using black nickel metal, for example, and you won’t get the same contrast with nickel (silver) as you will with black.

The evolution of a pin design! From a sketch, to a digital format and our template… to a finished pin! This design is by our own Tessa aka Starcandy.co
Vector Programs: Adobe Illustrator, Adobe Draw, InkScape or Corel Draw
If you’re already experienced with vector graphics programs, that’s awesome. By all means, send ‘em on over! A few things that make the process a little easier:
- Keep your vectors as clean and simple as possible
- Make sure to outline your fonts! Otherwise they may not come through. The easy way to do this is to select the text and in Ai, go to Type > Create Outlines. What this does is change a font into set artwork instead. If we do not have your font, it will try to auto replace it in the software, usually with a simple default font.
- Please unlock all your layers, and delete any layers/content that isn’t necessary.
- Avoid using clipping masks.
- Expand everything!
- If you feel comfortable using Pantones, please either assign them in your file or put a list on the artboard for us. To find the Pantone books in AI, select the swatches panel and click on the bottom (sometimes top) left icon that looks like a stack of books. In the drop down, select “color books” and pick Pantone+ Solid Coated. We can also use colors from the Pastels & Neons book, though neons will not be truly fluorescent.
- If you’re using vector software other than Adobe Illustrator, it’s easiest to save your vector as a PDF, EPS or SVG file.

This design was drawn in Adobe Draw with an Apple Pencil. Adobe Draw allows you to export images as vectors.
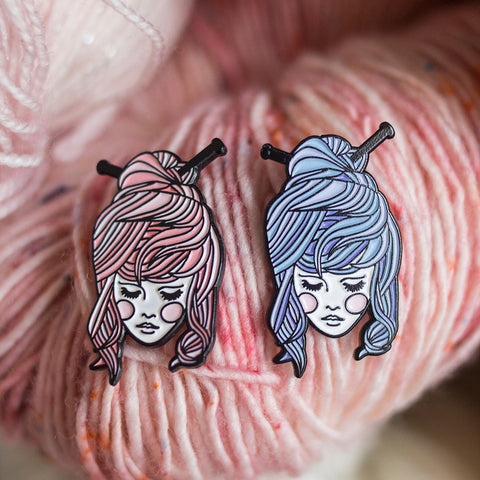
…and here’s the finished pin, in two color variants! Pin by Wild Hunt.
What Doesn’t Work So Well:
- Pencil sketches, most paintings, anything with a ton of colors and shading or indistinct, sketchy lines
- Photographs
- Gradients, textures, and other digital effects
If your art is heavy on those things and you really want to keep it that way, there is still an option- printed pins! We’ll talk about those in another post, but for now suffice to say: don’t despair, there is a way!


Share: